Context
I was given an interesting take-home assignment while interviewing for a
company last year: implement a simple peer-to-peer network of servers that
communicate with each other using a gossip protocol.
These were their requirements:
-
The network must support up to 16 individual servers (nodes) running
simultaneously
-
At any given time, each node can only have knowledge of 3 other nodes in the
network
-
At minimum, each node must provide two API methods:
def submit_message(message: str) -> None:
    """Handle an incoming message."""

def get_messages() -> List[str]:
    """Returns a list of all messages since this node started.

    Each message should include the path it followed to reach this node.

    Example output:
    - Apple (Node 1 -> Node 8 -> Node 10)
    - Banana (Node 3 -> Node 5 -> Node 10)
    - Orange (Node 7 -> Node 15 -> Node 9 -> Node 10)
    """
-
A message submitted to a single node should eventually be received by all
nodes in the network
-
Nodes can only communicate with each other through network calls (TCP, UDP,
HTTP, etc.), not in-process function calls
-
The solution must be implemented in Python
They provided stub classes for the client and the server, plus a simple CLI
for interacting with the gossip network. In effect, the design of the system.
Thus all that remained was for me to color in the boxes, so to speak.
Getting Started
The first order of business was to install the necessary base software: Python
3, Docker and Poetry.
After installing these and fixing an issue with the poetry lockfile that
failed to install the Python dependencies, I was ready to inspect and
experiment the skeleton gossip network using their provided commands:
start-network: spins up a network of 16 nodes using Docker Composestop-network: stops all nodes running in the networksend-message: send a message to a node once the network has been startedget-messages: returns all messages received by a single noderemove-node: stops a single node in the network
Unfortunately, I ran into another blocker here: the nodes nodes, which ran
as individual Docker containers, could not communicate with each other.
Being a Docker/containers skeptic, I decided to rip out the entire Docker
infrastructure and replace it with the simple to use multiprocessing module
from Python's standard library.
Once that was all in place, I was finally ready to start implementing the
client and the server.
Implementation Details
I shall showcase the components of the gossip network by walking you through,
roughly in sequence, what happens when one executes the send-message command
to any given node.
CLI & Client
The CLI is powered by the docopt package, and invoked
through Poetry. So when the command "gossip send-message <node-number>
<message>" is executed, docopt parses then recognizes that the predefined
command send-message has been invoked, thereby activating its following
conditional:
    elif args["send-message"]:
        message = args["<message>"]
        client = init_gossip_client(args["<node-number>"])
        client.send_message(message, relay_limit=int(args["--relays"]))
        print(f"Message sent to {client}")
Where init_gossip_client initializes and returns an instance of
GossipClient to the specified node, upon which the client's send_message
method below is invoked:
    def send_message(self, message: str, is_relay: bool = False, relay_limit: int = 1) -> None:
        """Send a message to the current server."""
        cmd = "/RELAY" if is_relay else "/NEW"
        self._send_to_server(f"{cmd}:{relay_limit}|{message}")
The _send_to_server "private" method opens a TCP socket connection
to its corresponding GossipServer's TCP-server running on
localhost:<node-number>.
When a new message is sent to a node (as in our example), cmd is set to
"/NEW". While intermediate nodes forwarding messages to their own neighbors
sets cmd to "/RELAY". The cmd metadata is then prepended to the entire
text streamed to the server.
This pseudo-IRC-command cmd metadata will be explained in more detail in the
Message Handling subsection of the server implementation
below.
Server
Each node's GossipServer has the single public method start, which is
called on execution of the start-network command. This creates an instance
of GossipTCPServer, which subclasses socketserver.ThreadingTCPServer,
thus providing the method serve_forever:
class GossipServer:
    """A server that participates in a peer-to-peer gossip network."""

    def __init__(self, server_address: str, peer_addrs: list[str]):
        """Initialize a server with a list of peer addresses.

        Peer addresses are in the form HOSTNAME:PORT.
        """
        hostname, port = server_address.split(":")
        self.host_port_tup = (hostname, int(port))
        self.ss = ServerSettings(hostname, port, peer_addrs)

    def start(self) -> None:
        print(f"Starting Gossip-Node-{self.ss.node_id} with peers:".ljust(36) + f" {', '.join(str(p.id) for p in self.ss.peers)}")
        with GossipTCPServer(self.host_port_tup, GossipMessageHandler, self.ss) as server:
            server.serve_forever()
Server Settings
The property ss above is the ServerSettings dataclass shown below, which
essentially holds all the configuration data (hostname, port, node_id,
etc.) and state (peers, received messages stored in msgs_box) for each
node:
@dataclass
class ServerSettings:
    hostname:   str
    port:       int
    peer_addrs: list[str]
    node_id:    int = None
    peers:      list[GossipClient] = field(init=False)
    msgs_box:   dict[dict] = field(default_factory=dict)
Message Handling
The bulk of the work is of course performed by GossipMessageHandler:
class GossipMessageHandler(StreamRequestHandler):

    def handle(self) -> None:
        self.cmd, self.msg_data = self.rfile.readline().strip().decode().split(":", maxsplit=1)
        self._get_cmd_handler()()

    def _get_cmd_handler(self) -> Callable[[], None]:
        return {
            "/NEW":    self._proc_new_msg,
            "/RELAY":  self._proc_relayed_msg,
            "/GET":    self._send_client_msgs_data,
            "/PEERS":  self._get_peers_info,
            "/REMOVE": self._remove_peer,
        }[self.cmd]
As you can see from the definition of _get_cmd_handler above, 5 commands,
encoded in the aforementioned pseudo-IRC-command style, are recognized.
When the bytestream from the node's client is recieved and handled by the
server, the data is split into 2 portions: the command and the message data.
In our example with the "/NEW" command, _proc_new_msg will be called to
handle it:
    def _proc_new_msg(self) -> None:
        self._set_relay_limit_and_msg_text_on_send()
        self.msg_id = f"{self.msg_content}_{time.time_ns()}"
        self.curr_msg_attrs = self.server.ss.msgs_box[self.msg_id] = self._init_new_msg_attrs()
        self.node_path = [self.server.ss.node_id]
        self._save_path_and_relay()
First the msg_data is parsed to set the relay_limit, and the message
content. Second the current timestamp is appended to the messge content to
create its unique msg_id. Then a metatdata dict is initialized for the
current message using _init_new_msg_attrs:
    def _init_new_msg_attrs(self) -> Dict[str, Union[list, dict, bool]]:
        return {
            "in_paths":   [],
            "in_counts":  Counter({p.id: 0 for p in self.server.ss.peers}),
            "out_counts": Counter({p.id: 0 for p in self.server.ss.peers}),
            "is_unread":  True,
        }
The "in_paths" key will come to contain the list of nodes this message has
traversed to reach the current node. The "in_counts" & "out_counts" are
respectively used to track whether the current node should accept then save
the incoming message, and broadcast it back out (again) to its neighbors, as
determined by the value of relay_limit.
The new message and its metadata are saved into the node's ss.msg_box. Then
finally, relayed onwards to its peers through _save_path_and_relay:
    def _save_path_and_relay(self) -> None:
        self.curr_msg_attrs["in_paths"].append(self.node_path)
        self._relay_to_peers((self.msg_id, self.node_path))

    def _relay_to_peers(self, data: tuple[str, list[int]]) -> None:
        for p in self._get_peers_to_relay():
            if self.curr_msg_attrs["out_counts"][p.id] < self.relay_limit:
                p.send_message(json.dumps(data), is_relay=True, relay_limit=self.relay_limit)
                self.curr_msg_attrs["out_counts"][p.id] += 1

    def _get_peers_to_relay(self) -> list[GossipClient]:
        if self.cmd == "/NEW":
            return self.server.ss.peers
        elif self.cmd == "/RELAY":
            # filter out the preceeding node which relayed the current message to this node
            return [p for p in self.server.ss.peers if p.id != self.prev_node]
        else:
            raise Exception("this should never be reached!")
As you can see above in _get_peers_to_relay, when a message sent to the
node is "/NEW", the current node will relay the message to all of its
neighbors server.ss.peers through the p.send_message(...) calls in
_relay_to_peers. But if the message was already one that has been
relayed to it from a previous node (self.cmd == "/RELAY"), the prev_node
will be filtered out, and skipped as the current node proceeds with its own
relaying responsibilities.
Peers & Network Graphs
The last core component of this gossip network is the piece responsible
for the network topology and peers assignment. You may recall from the
ServerSettings dataclass definition shown earlier that
each server node contains a peers property of type list[GossipClient].
How exactly are these peers assigned, and by extension the entire network
constructed?
As is often the case with Python, a mature and robust library exists for one's
domain of interest, which in our case is NetworkX:
a Python package for the creation, manipulation, and study of the structure,
dynamics, and functions of complex networks.
NetworkX provides graph generators
for over a hundred types of graphs. Once a Graph
object has been instantiated with the desired parameters like the number of
nodes, useful operations such as retrieving the neighbors/peers of any given
node are provided as primitives by its API. Giving us exactly what's needed.
Ciruclar Network
Using NetworkX's cycle_graph generator, it was trivial to replace the stub
graph generator provided in the original project scaffold.
 Fig. 1: circular network of 16 nodes
Random Network
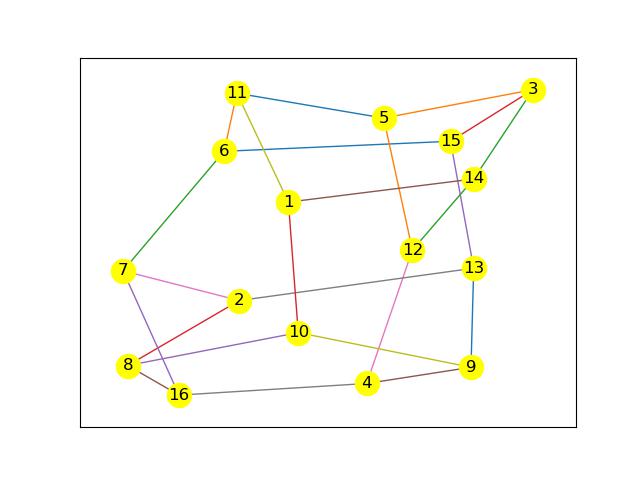
Along the same vein, generating a random network is also straightforward with
random_regular_graph. In addition to specifying the number of nodes n, we
must also pass the degree d of each node, which defaults to 3 (as specified
in the problem requirements). Note that n×d must be an even integer, by the
handshaking lemma.
 Fig. 2: random network of 16 nodes with 3 neighbors each
Power Law Network
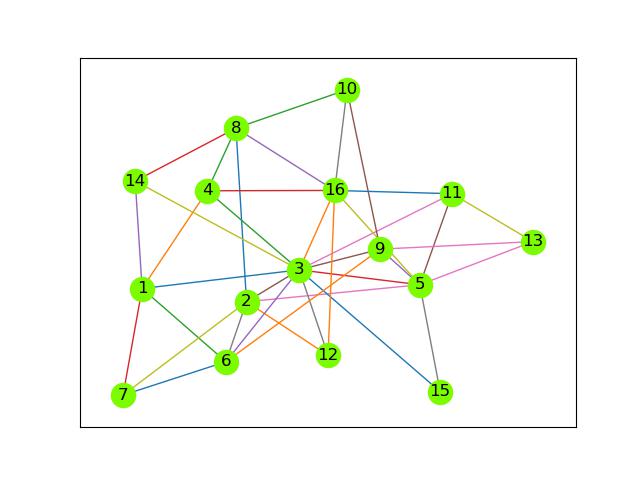
There also exists powerlaw_cluster_graph,
a power law degree distribution generator. Here is an example of such a
network:
 Fig. 3: power law network of 16 nodes
Turán Network
Adding a new type of network can also be done with relative ease, which I
shall demonstrate by example.
First, we'd need to add the new network type to the docopt CLI
description in gossip/cli.py, and correctly handle its parameters in
gossip/start_network.py.
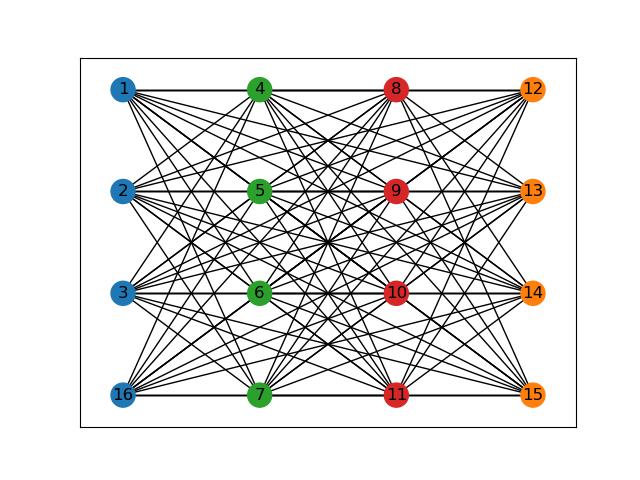
Then we'd implement TuranNetwork as a new subclass of GossipNetwork inside
gossip/network.py:
class TuranNetwork(GossipNetwork):

    def __init__(self, num_nodes: int, r_partitions: int):
        self.r_parts = r_partitions
        super().__init__(num_nodes)

    def _get_network_graph(self) -> nx.Graph:
        return nx.turan_graph(self.num_nodes, self.r_parts)
As you can see, it's not doing much more than transparently calling NetworkX's
built-in Turán graph generator.
To make the key property of the Turán graph more evident, I also overrode
the _draw_network method inherited from the GossipNetwork parent class,
which gives us the more visually-intuitive representation below:
 Fig. 4: Turán network of 16 nodes with 4 partitions
Feel free to review the full patch adding the Turán network here.
Demonstration
With the hard work out of the way, let's now take a look at what the (more or
less) finished product can do.
Using the concrete example of the random network shown in
Fig. 2 above, let's first send a message to node 1:
$ poetry run gossip send-message 1 "Hello World"
Message sent to Gossip-Node-1
Then check the messages received by node 10:
$ poetry run gossip get-messages 10
Fetched all messages from Gossip-Node-10; showing all path(s):

• Hello World
  ↳ 1 ➜ 10
  ↳ 1 ➜ 14 ➜ 12 ➜ 4 ➜ 9 ➜ 10
  ↳ 1 ➜ 14 ➜ 12 ➜ 4 ➜ 16 ➜ 8 ➜ 10
By default, the command will display all paths taken by the message to reach
the node in question, of which there are 3 here, one each from node 10's
neighbors: 1, 9 & 8 respectively to the paths shown above.
We can also tell it to display the shortest, longest, & shortest + longest
paths using the -p, -p & -ppp flags respectively. For example on node 6:
$ poetry run gossip get-messages 6 -pp
Fetched all messages from Gossip-Node-6; showing shortest & longest path(s):

• Hello World
  ↳ 1 ➜ 11 ➜ 6
  ↳ 1 ➜ 10 ➜ 8 ➜ 2 ➜ 7 ➜ 6
The get-messages command can optionally return just the read or unread
messages; a message on node x becomes "read" once it has been retrieved
with poetry run gossip get-messages x. Additionally, you can pass it the
repeatable -t flag to view the timestamp of messages with varying levels of
detail.
Next let's list the peers of node 4:
$ poetry run gossip list-peers 4
Gossip-Node-4 has peers:
* Gossip-Node-9 (127.0.0.1:7009)
* Gossip-Node-12 (127.0.0.1:7012)
* Gossip-Node-16 (127.0.0.1:7016)
Followed by removing one of its peers, say node 12:
poetry run gossip remove-node 12
Gossip-Node-12 removed
Now we see node 4 only has 2 peers remaining:
$ poetry run gossip list-peers 4
Gossip-Node-4 has peers:
* Gossip-Node-9 (127.0.0.1:7009)
* Gossip-Node-16 (127.0.0.1:7016)
And if we send another message to the network by way of node 1:
$ poetry run gossip send-message 1 "Goodbye"
Message sent to Gossip-Node-1
Then check the message box of node 4:
$ poetry run gossip get-messages 4
Fetched all messages from Gossip-Node-4; showing all path(s):

• Hello World
  ↳ 1 ➜ 14 ➜ 12 ➜ 4
  ↳ 1 ➜ 10 ➜ 9 ➜ 4
  ↳ 1 ➜ 11 ➜ 6 ➜ 7 ➜ 16 ➜ 4

• Goodbye
  ↳ 1 ➜ 10 ➜ 9 ➜ 4
  ↳ 1 ➜ 11 ➜ 6 ➜ 7 ➜ 16 ➜ 4
We can see the path that allowed the first message "Hello World" to reach
node 4 from node 12, is no longer usable when we sent the second message
"Goodbye". But of course, due to the built-in redundancy in the gossip
network, the message still reached its destination, which is the entire point.
Final Words
When working with decentralized networks, gossip as a family of protocols can
certainly be a valuable tool to achieve certain desired behaviors. Here are a
couple real-world production-ready examples:
Although this toy project is far from being production-ready for any practical
utilities, I do hope the walkthrough provided an adequate high-level
understanding of how pieces of such a system can be put together, as well as
useful implementation details in the send-message example showcasing how
commands are both initiated and handled.
If you wish to play around with this example, you can find the full project
code on my GitHub here.